密码一键自动输入器 的教程
材料清单

电阻10k x2
Pro Micro x1(或其他ATmega32u4芯片的Arduino)
纸盒 x1(你当然可以找一个更坚固又漂亮的盒子)
按钮 x2
跳线 x若干
烙铁 x1
热熔胶枪 x1
组装

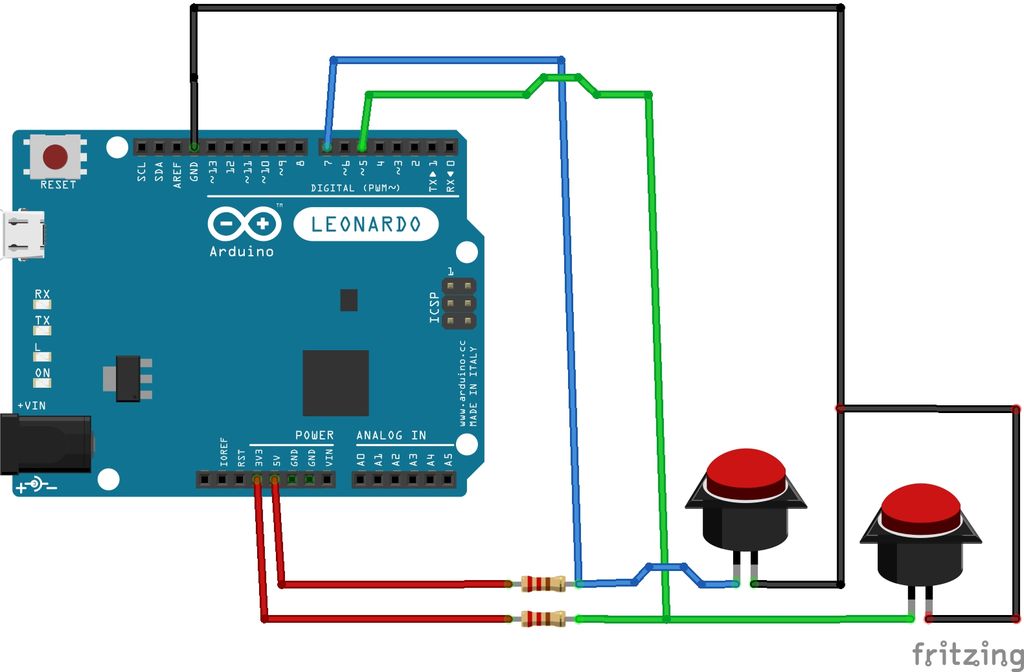
如图所示。按照图片上的电路图接线。通过电阻将Pro Micro上的VCC/RAW连接到按钮。连接Pro Micro上数字引脚的电缆将与按钮上的电源相同。最后,返回地(GND)。
最后使用热熔胶将组件固定。
输入代码
#include <Keyboard.h>
#define buttonPin  7 // Permanently makes buttonPin's value 7.
#define buttonPin2  5 // Permanently makes buttonPin2's value 5.

void setup() {

pinMode(buttonPin,INPUT); // Set the pins  as inputs.
pinMode(buttonPin2,INPUT);
Serial.begin(9600);
Keyboard.begin(); // Start the keayboard funktions

}

void loop() {
 int buttonState = digitalRead(buttonPin); //read the state of the button input
int buttonState2 = digitalRead(buttonPin2); //read the state of the button input
if (buttonState == LOW) { //pressing the button will produce a LOW state 0V

Serial.println(buttonState);
Keyboard.print ("m05Ts3cUR3Pa55W0rDewWa"); //在这里替换成你的密码
 delay (1000);

 }

if (buttonState2 == LOW) { //pressing the button will produce a LOW state 0V
Keyboard.print ("5eConDm05Ts3cUR3Pa55W0rDewWa"); //在这里替换成你的第二个密码
 delay (1000);
}

}
如果你有需要,你可以在输入你的 username / email,然后输入密码。放入这段Keyboard.print()代码就OK啦!。
<Keyboard.print("Your username");//输入用户名
delay(100);
Keyboard.press(KEY_TAB);//模拟键盘按一下TAB键
delay(100);
Keyboard.print("Your password"); //输入密码
全部完成!

只要把它与你的电脑相连就可以使用啦!是不是非常的简单呢!
另外,如果需要配置多组不同的密码和操作按钮,可以通过添加开关和修改程序中的相关逻辑很轻易地实现。