详细说明
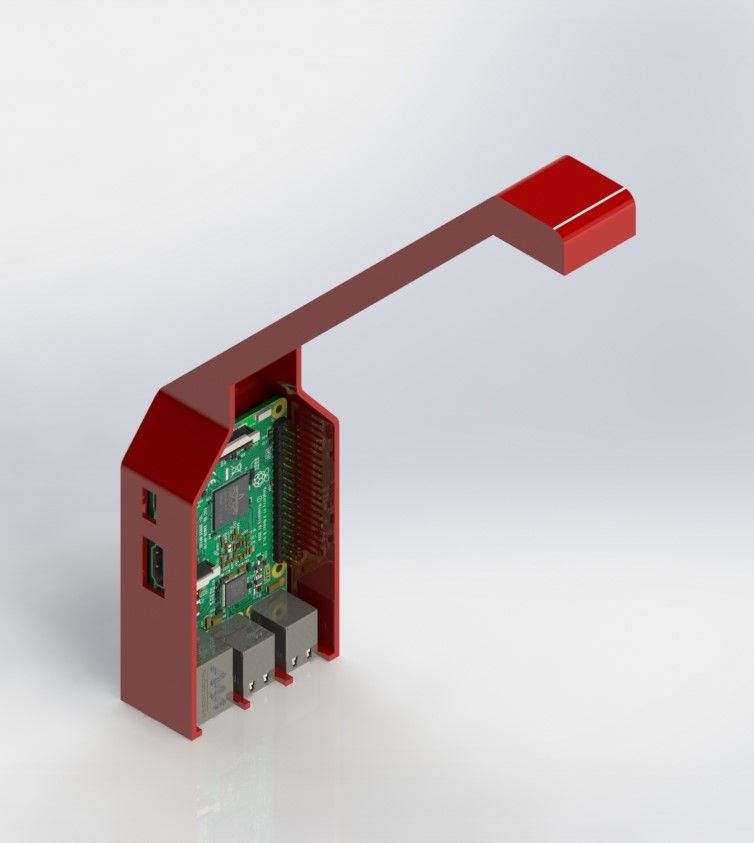
CribSense 是一款能监测宝宝活动并能发出警报的监视器。只需一个周末的时间,你完全可以根据教程 DIY 来实现。根据自家宝宝的情况配置好软件部分,例如如果监测到宝宝不动了,则会发出警报。另外,项目中所有软件都是免费的,并且易于扩展。
该监视器是基于 Video Magnification 的 C++ 实现:
http://people.csail.mit.edu/mrub/vidmag/
所有的源文件和文档信息请点击下方链接:
https://github.com/lukehsiao/CribSense
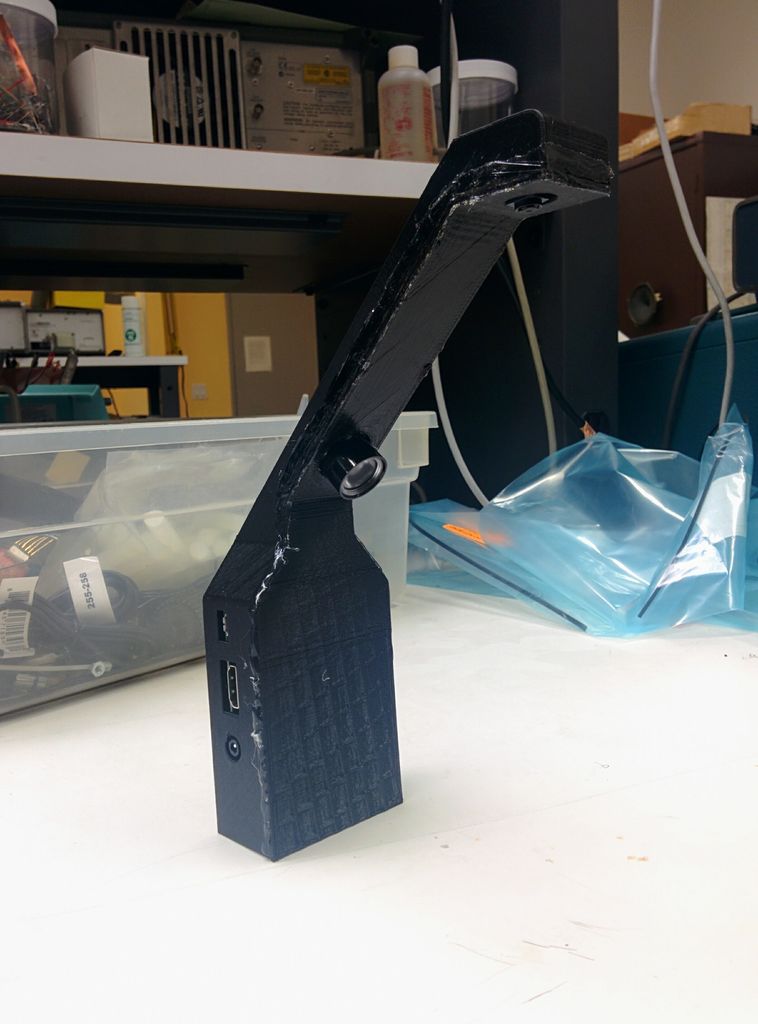
我们将其作为一个有趣的原型项目项目来研究,任何市场上的产品都需要做更多的测试。因此,如果你使用这个项目,还需要自行做额外的探索。
链接表
教程
组件清单
- 树莓派 3 Model B × 1
- 5V 2.5A Micro USB 电源 × 1
- 树莓派 NoIR(夜视红外)摄像头模块V2 × 1
- MicroSD 卡 × 1
- 树莓派软排线12英寸 × 1
- 3.5mm 输入扬声器 × 1
- HDMI 显示器 × 1
- USB 键盘 × 1
- USB 鼠标 × 1
- 树莓派散热片(可选) × 1
- 1N4001 二极管 × 3
- 1 ohm 1W 电阻 × 1
- 1W 红外 LED × 1
- 电线 × 2
- 烙铁 × 1
- 3D 打印外壳 × 1
- 热熔胶 × 1
材料清单
树莓派摄像头配置工具
树莓派 3 Model B×1
5V 2.5A Micro USB 电源×1
树莓派 NoIR(夜视红外)摄像头模块V2×1
MicroSD 卡×1
树莓派软排线12英寸×1
3.5mm 输入扬声器×1
HDMI 显示器×1
USB 键盘×1
USB 鼠标×1
树莓派散热片(可选)×1
弱光操作下的 IR LED 电路
1N4001 二极管×3
1 ohm 1W 电阻×1
1W 红外 LED×1
电线×2
烙铁×1
外壳
3D 打印外壳×1(9.9" 长 x 7.8" 宽 x 5.9" 高)
热熔胶×1
准备工作
在项目开始之前,请在 SD 卡上安装了最新版本的 Raspbian,并确保树莓派的功能正常。
https://shumeipai.nxez.com/2013/09/07/raspberry-pi-under-windows-system-installation-to-sd-card.html
你还需要启用摄像头模块,才能访问摄像头。
https://shumeipai.nxez.com/2014/09/21/raspicam-documentation.html
安装 CribSense 软件
CribSense 依赖于 autoconf,libtool,OpenCV 和 libcanberra 等常见的软件工具。
https://www.gnu.org/software/autoconf/autoconf.html
https://www.gnu.org/software/libtool/
https://opencv.org/
http://0pointer.de/lennart/projects/libcanberra/
autoconf 和 libtool 用于许多平台(例如 Linux,OSX 和树莓派),可以自动配置 Makefile 和构建脚本。
OpenCV 是一款强大的计算机视觉软件包,它是以 Video Magnification 和运动检测代码的基础,用于进行图像处理。它具有强大的支持,易于使用且性能良好。
libcanberra 是一个简单播放声音的库。用于播放 CribSense 的警报声。
你可以访问它们的页面,获取完整的信息。
在树莓派上打开一个终端并运行以下命令来安装它们:
sudo apt-get install git build-essential autoconf libtool libopencv-dev libcanberra-dev接下来,将 bcm2835-v4l2 添加到 /etc/modules-load.d/modules.conf 中,摄像头驱动程序将设置为自动加载。你的 modules.conf 应该是这样:
# /etc/modules: kernel modules to load at boot time.
#
# The file contains the names of kernel modules that should be loaded
# at boot time, one per line. Lines beginning with "#" are ignored.

i2c-dev
bcm2835-v4l2
文件编辑完后,重新启动树莓派。CribSense 将从 NoIR 摄像头获取画面。
然后,通过运行以下命令来复制存储库:
git clone https://github.com/lukehsiao/CribSense.git接下来,进入存储库并通过运行以下命令构建软件。
cd CribSense
./autogen.sh --prefix=/usr --sysconfdir=/etc --disable-debug
make
sudo make install
sudo systemctl daemon-reload
现在,所有的软件都安装完毕。
配置
CribSense 可通过简单的 INI 配置文件进行自定义。运行 make install 后,配置文件位于 /etc/cribsense/config.ini 中。你可以通过运行以下命令查看和编辑这些参数。
sudo nano /etc/cribsense/config.ini默认配置中对每个参数,都做了简要说明。更多详细信息请点击:https://lukehsiao.github.io/CribSense/setup/config/
运行 CribSense
CribSense 是通过使用 systemd 服务在启动时运行的。使用键盘和鼠标连接到树莓派,确保配置参数适用于你的婴儿床。如果将其移动,则需要重新调整这些参数。
当你调整参数时,请输入以下命令,就可在命令行随意运行 cribsense。
cribsense --config /etc/cribsense/config.ini调试完成后,就可以启用自动运行。
sudo systemctl enable cribsense你可以通过输入以下命令来停止 cribsense 的自动运行。
sudo systemctl disable cribsense软件简介
CribSense 软件是该项目的核心和灵魂。在 MIT 的有很多关于 Video Magnification 的优秀演示。
http://people.csail.mit.edu/mrub/vidmag/
我想在树莓派上运行类似的算法。为了在树莓派上实时运行,就必须要求 tbl3rd 在其 C++ Video Magnification 实现的要比原来快 10 倍以上。
https://github.com/tbl3rd/Pyramids
这就需要优化指导我们的软件设计。
CribSense 通过软件实现下面的循环。
1、它将每个 640x480 的灰度视频帧分为三个水平部分(640x160),以便实现更好的缓存位置。
2、它会在单独的线程中放大每个段,并监视帧中看到的运动。在监视运动几秒钟后,它确定运动的主要区域并将帧裁剪到该区域。这种算法减少了需要处理的像素总数。
3、CribSense 监视裁剪后的视频流中的运动量,如果在配置的时间内未感知到运动,就会发出警报。CribSense 会定期重新打开视图并监视整个帧,如果婴儿已移动并在新的区域,将其范围进行重新修剪。
4、视频放大率用于提高例如婴儿呼吸之类的细微运动的信噪比。较大的动作不会起作用,但对于非常细微的动作却有很大的帮助。请注意,我们项目的实现只能粗略适用于 MIT 中描述的算法并且使用他们的代码,性能没有那么好。
多线程优化,自适应裁剪和编译器优化之类的优化分别使我们的速度提高了约 3 倍,3 倍和 1.2 倍。这就使我们达到了在树莓派上运行所需的 10 倍提速。
更多详细信息可以在 CribSense 存储库的 Software Architecture 上找到。
https://lukehsiao.github.io/CribSense/setup/sw-setup/#software-architecture-details
更多有关 Video Magnification 的信息,请点击 MIT 页面查看。
http://people.csail.mit.edu/mrub/vidmag/
硬件部分
连接摄像头
将摄像头附带的 6" 软排线换成 12" 的。
IR LED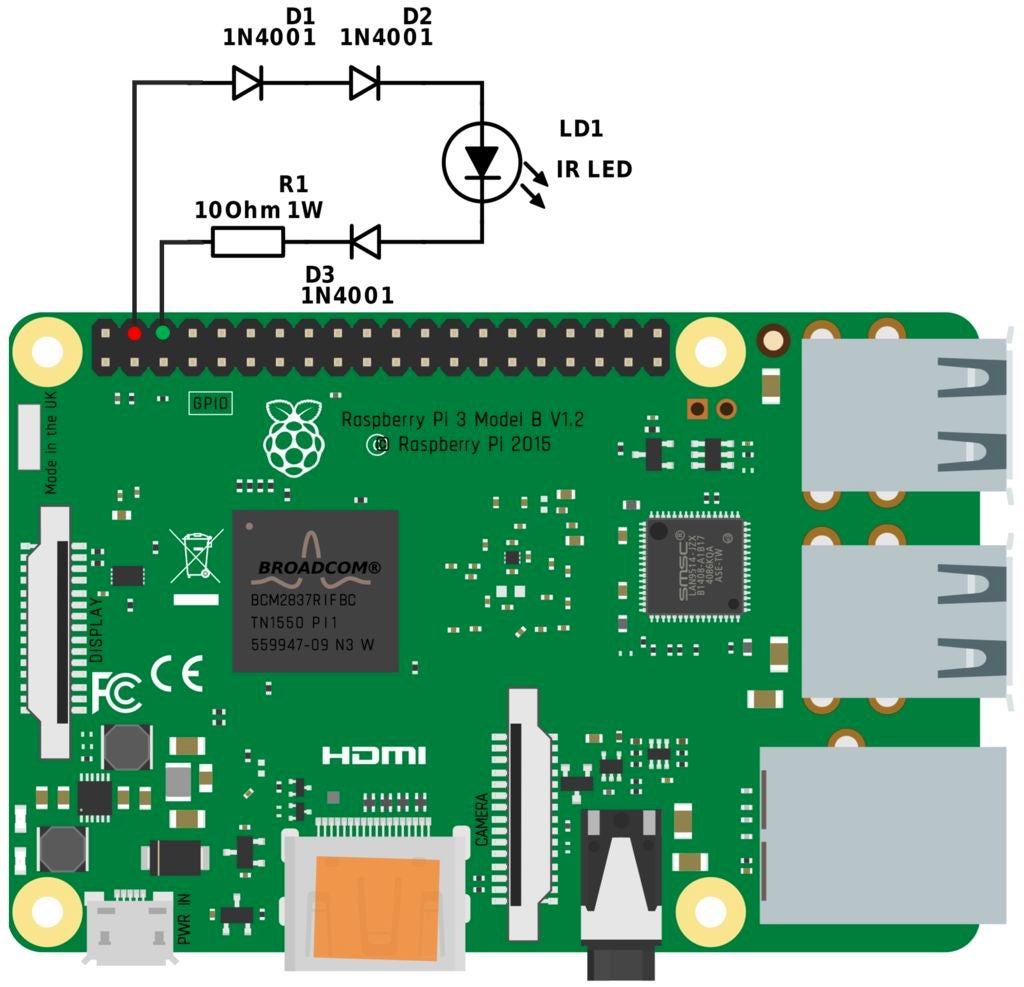
CribSense 相对容易构建,并且项目所需组件也容易购买。如图所示,项目由五个主要的硬件构成,其中只有两个是定制的。下面将逐步介绍如何构建 IR LED 电路,先来介绍如何构建底盘。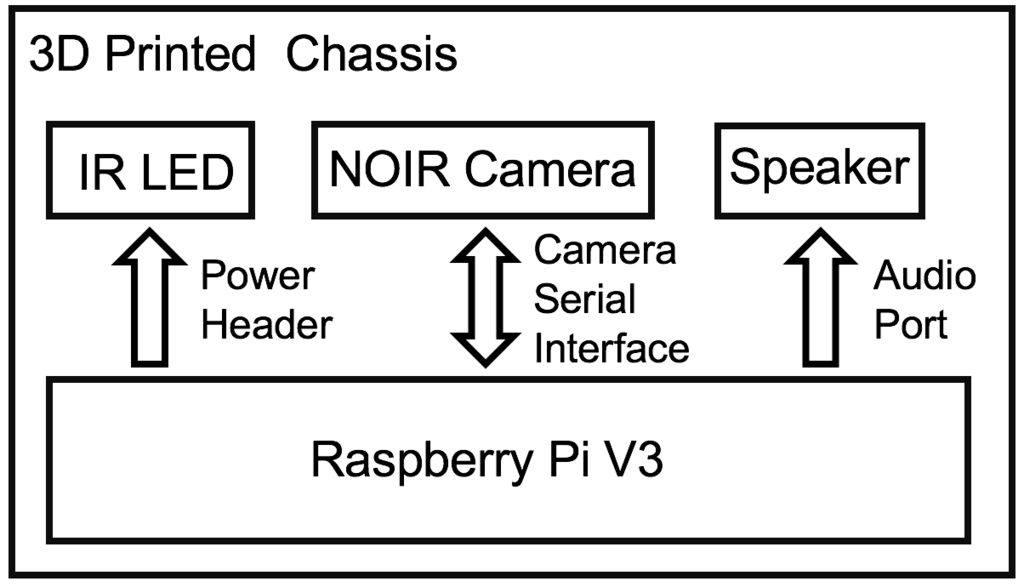
这一部分你需要烙铁、电线、二极管、IR LED 和电阻器。如图所示构建电路。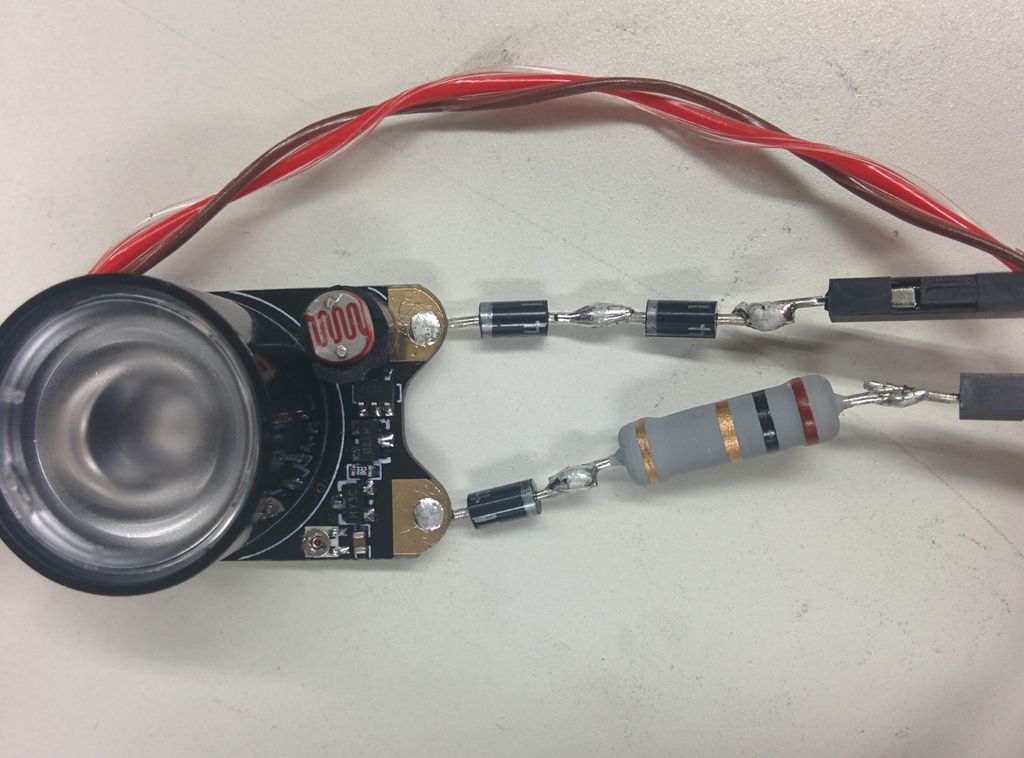
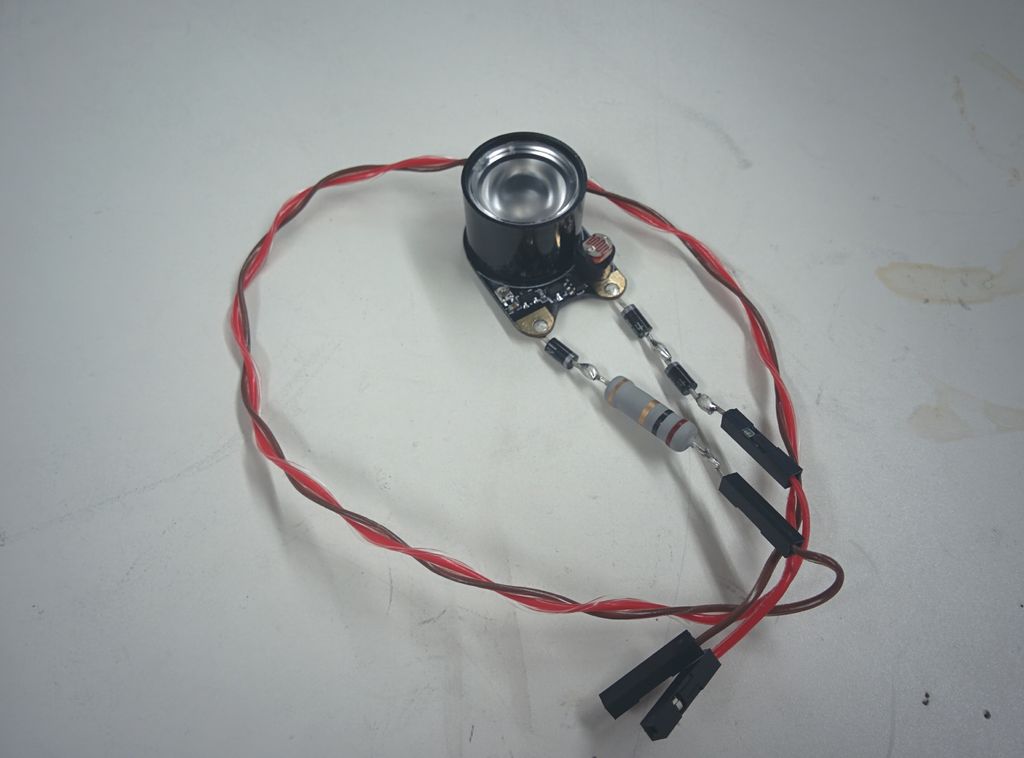
为了在夜间提供充足的照明,我们使用了红外 LED,人眼不可看,但 NoIR 摄像头可见。与树莓派相比,IR LED 不会消耗很多功率,因此为方便,我们将 IR LED 保持打开状态。
在早期版本的树莓派中,针脚的最大电流输出为 50mA。
https://pinout.xyz/pinout/pin1_3v3_power
树莓派 B+ 将其增加到 500mA。但为简单起见,我们仅使用 5V 电源针脚,它可以提供高达 1.5A 的电流。
https://pinout.xyz/pinout/pin2_5v_power
根据测量,IR LED 的正向电压约为 1.7-1.9V。尽管 IR LED 可以吸收500mA 电流而不出现损坏,但我们还是将电流减小到 200mA 左右,以减少热量和总功耗。实验结果还表明,在输入电流为 200mA 的情况下,红外 LED 足够亮。为了桥接 5V 和 1.9V 之间的间隙,我们使用了三个 1N4001 二极管和一个与 IR LED 串联的 1 Ohm 的电阻。导线,二极管和电阻上的电压分别约降为 0.2V、0.9V(每一个)和 0.2V。因此,IR LED 上的电压为 5V-0.2V-(3 * 0.9V)-0.2V = 1.9V。LED 的散热量为 0.18W,电阻的散热量为 0.2W,均在其最大额定值之内。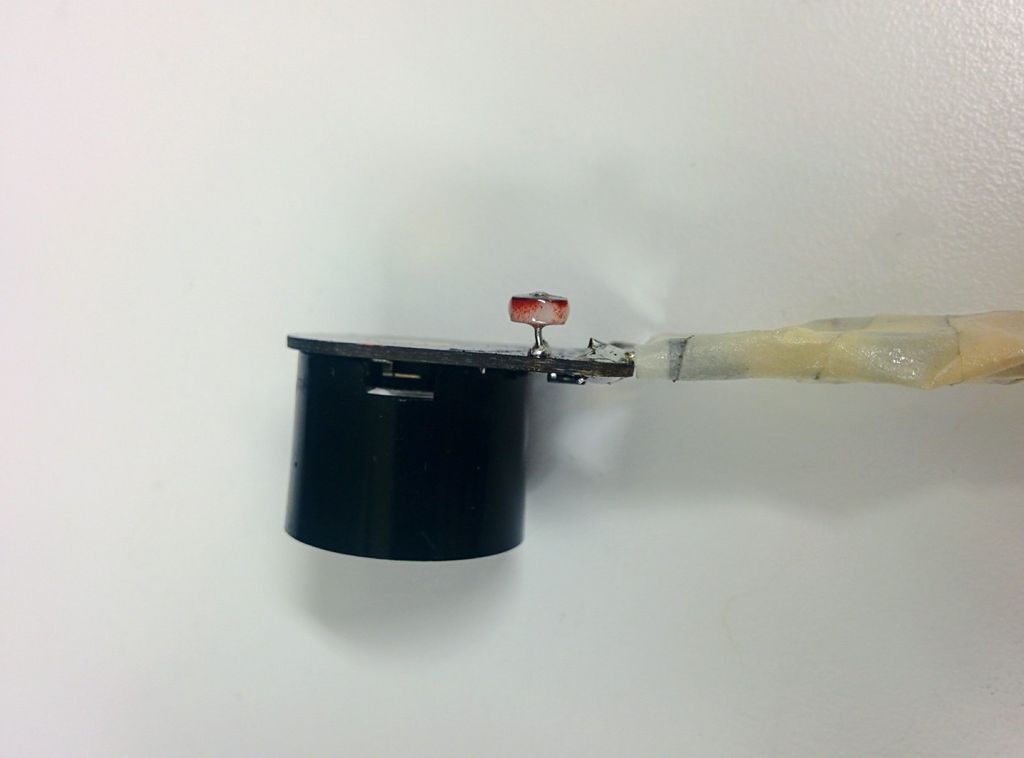
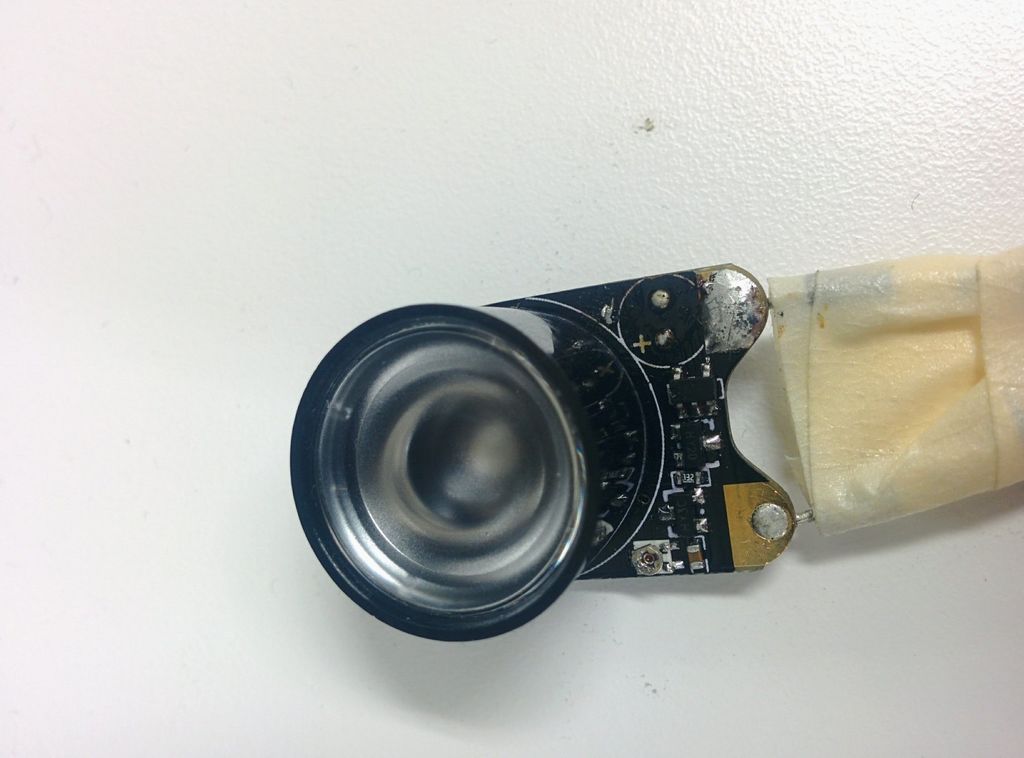
为了更好与 3D 打印的外壳相匹配,我们使 IR LED 透镜从底座中伸出,并使 PCB 板与孔齐平。右下角的小光电二极管会挡住。如图所示,为了解决这个问题,我们将其拆焊并将其翻转到板子的另一侧。这个光电二极管不需要,因为我们希望 LED 一直亮着。只需将其换到另一侧,即可保持原始 LED 电路不变。
注意:焊接电线时,请确保电线至少 12" 长,并可与树莓派 GPIO 上的针脚接头。
外壳
源文件包括: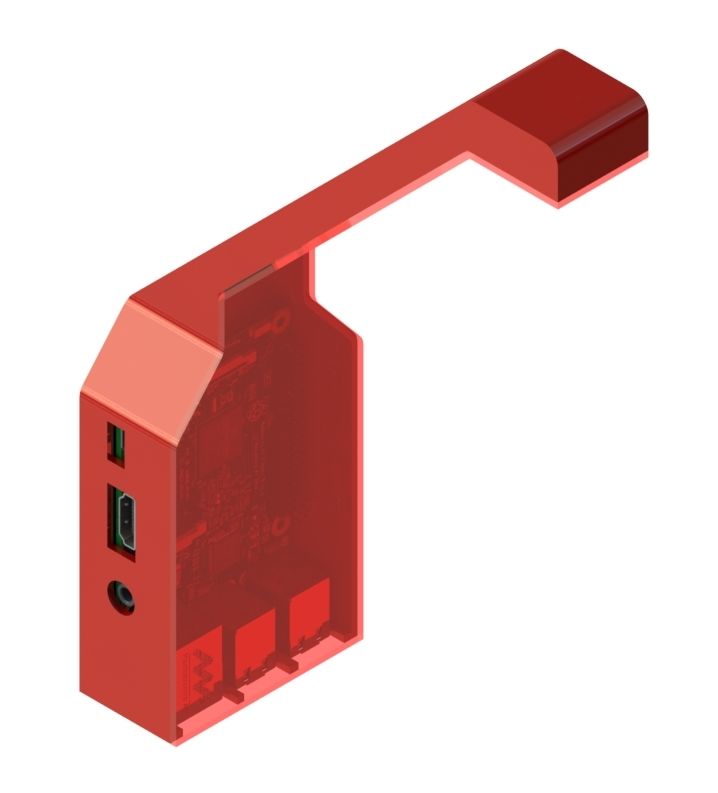
外壳的 STL
https://github.com/lukehsiao/CribSense/blob/master/chassis/case.stl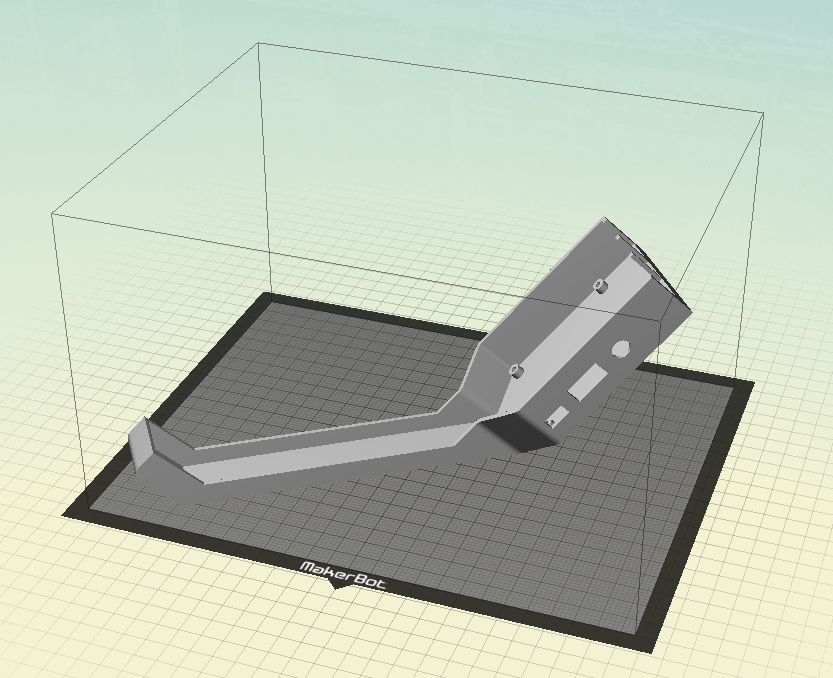
外壳 机型
https://raw.githubusercontent.com/lukehsiao/CribSense/master/chassis/case.makerbot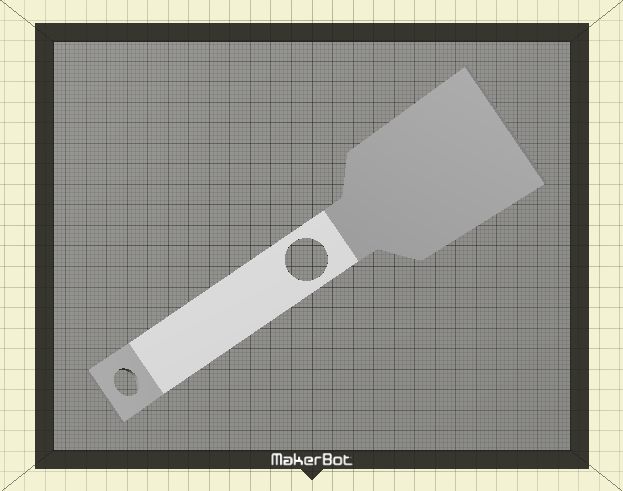
盖子 STL
https://github.com/lukehsiao/CribSense/blob/master/chassis/cover.stl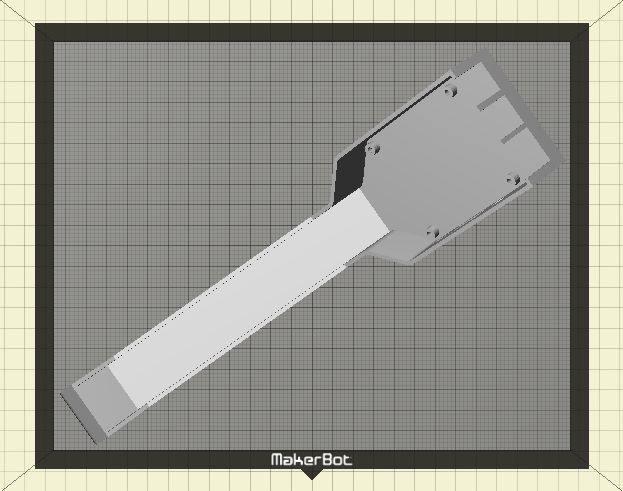
盖子的机型
https://raw.githubusercontent.com/lukehsiao/CribSense/master/chassis/cover.makerbot
打印的最小尺寸为:9.9"(L)x 7.8"(W)x 5.9"(H)。你可在某宝打印外壳。最小打印分辨率为 0.015"。建议使用 PLA 打印外壳。
3D 打印的外壳可以容纳树莓派、摄像头和 LED。是否使用这个外壳可选,但这款外壳可以防止幼儿接触裸露的电子电路。因为每个婴儿床都不一样,因此外壳不包括安装支架。
关于支架有以下几个选项:电线扎带、3M 双锁、魔术贴以及胶带。
组装硬件
准备好所有硬件后,即可开始组装。在过程中建议使用热熔胶,速干且可易于移除后再使用。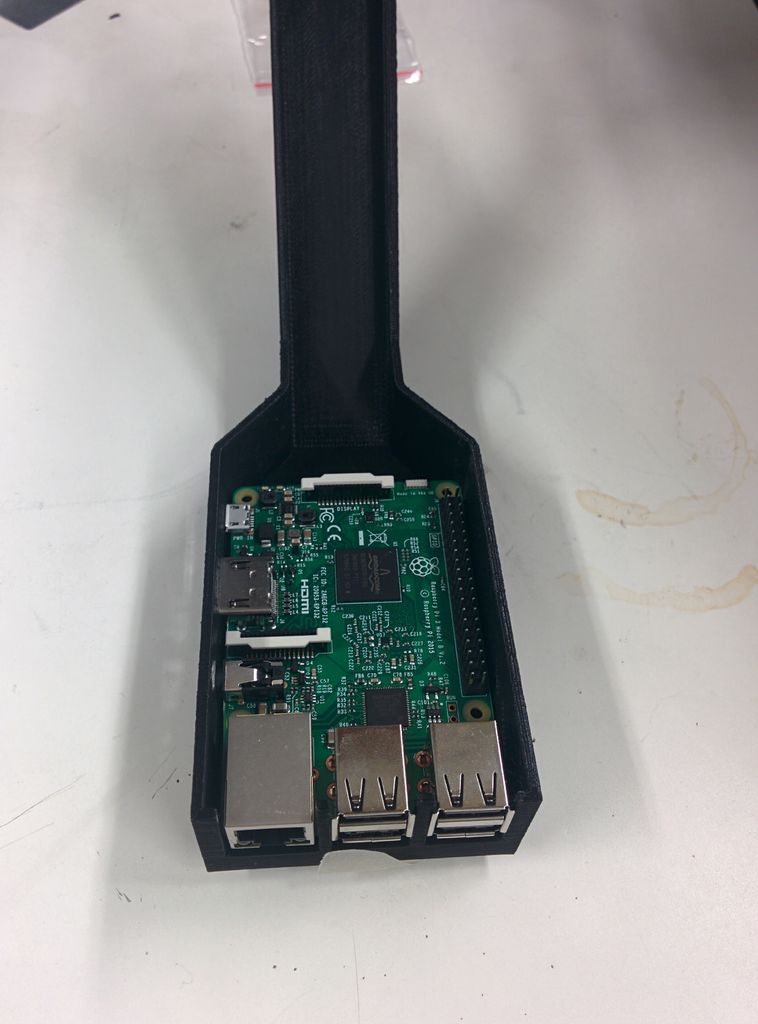
1、将树莓派装入外壳。你需要稍微弯曲一下才能插入音频端口。安装到位后,请确保仍可以访问所有端口。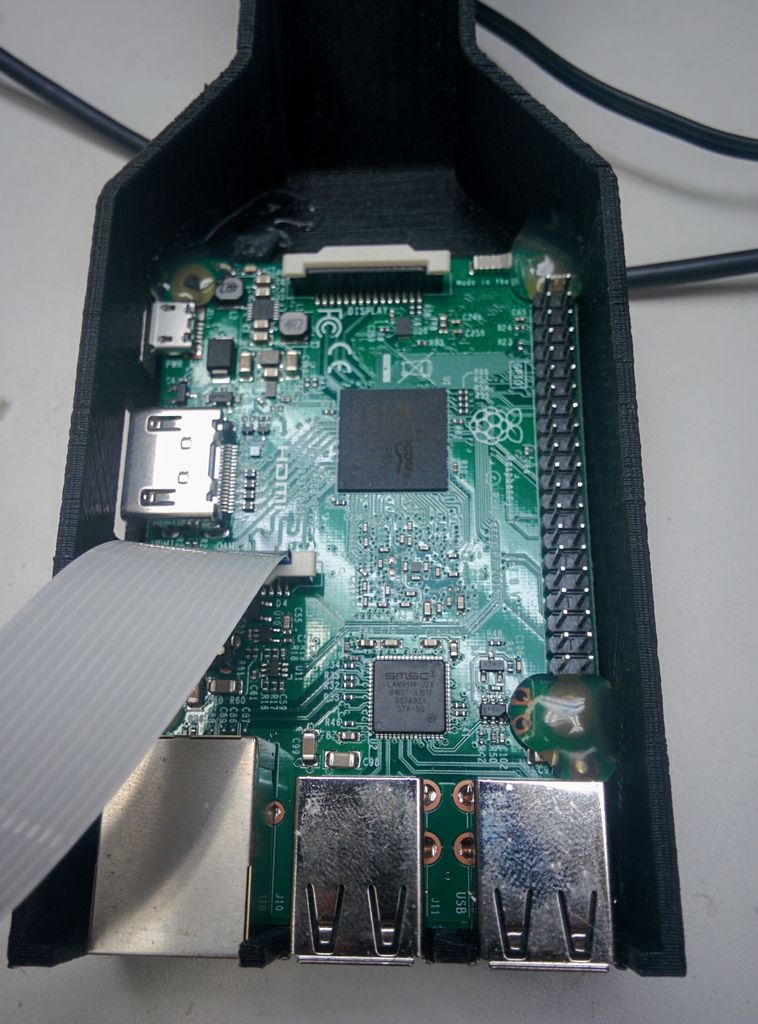
2、使用热熔胶将树莓派固定到位,然后将摄像头连接到树莓派。你也可以选择螺丝固定。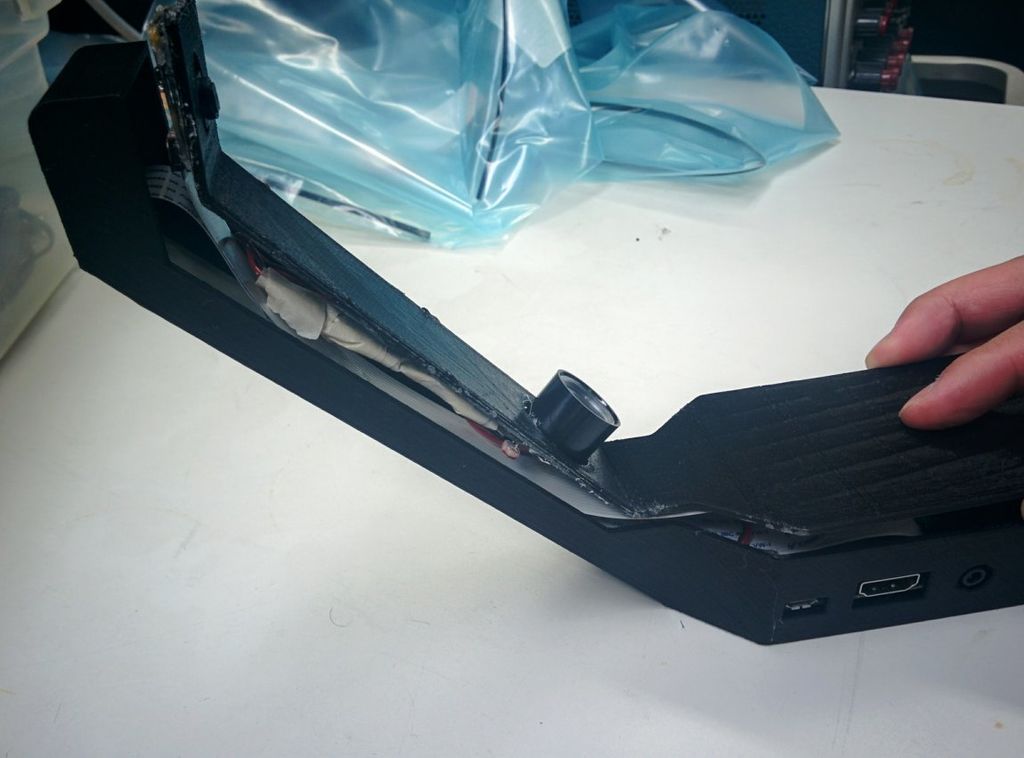
3、将 LED 和摄像头粘到前盖。将 NoIR 摄像头粘到摄像头孔中。确保摄像头紧贴并与外壳对齐。请不要使用太多胶水,否则你将无法将摄像头安装到主机壳中。给树莓派通电后,检查摄像头(例如raspistill -v),确保其具有良好的视野。如果视角不佳,将重新放置。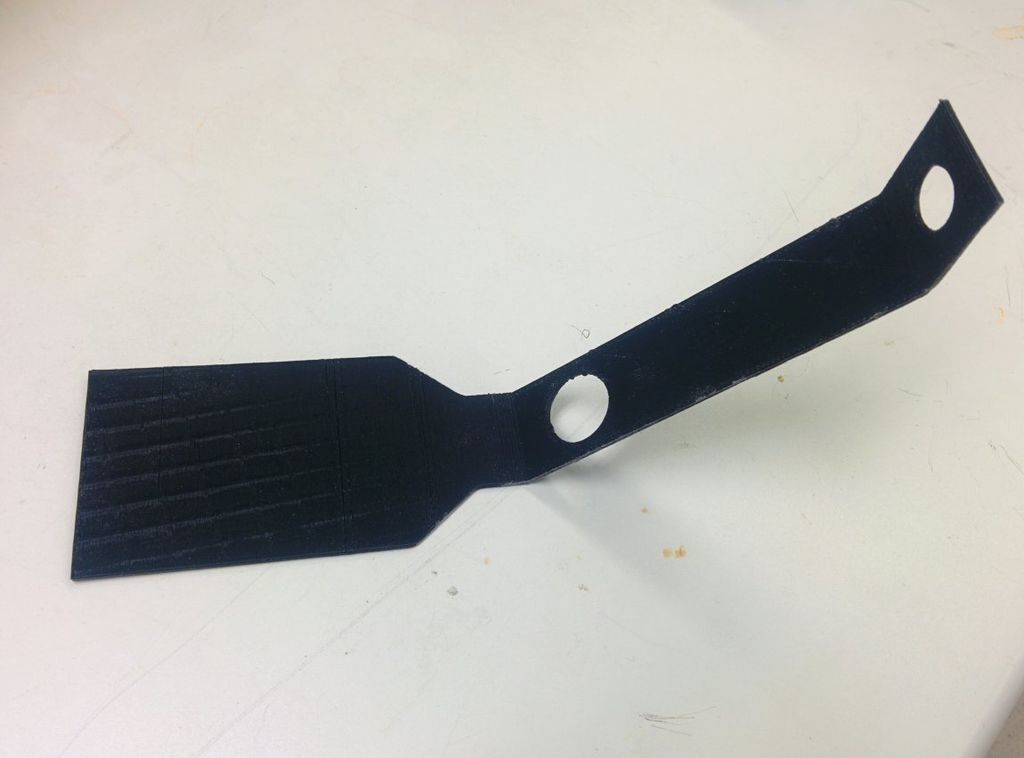
4、将 IR LED 粘贴到盖子颈部的孔中。颈部与婴儿床侧面成 45°。在光线不足的情况下会产生更多阴影,需要增加图像的对比度,便于更容易检测运动。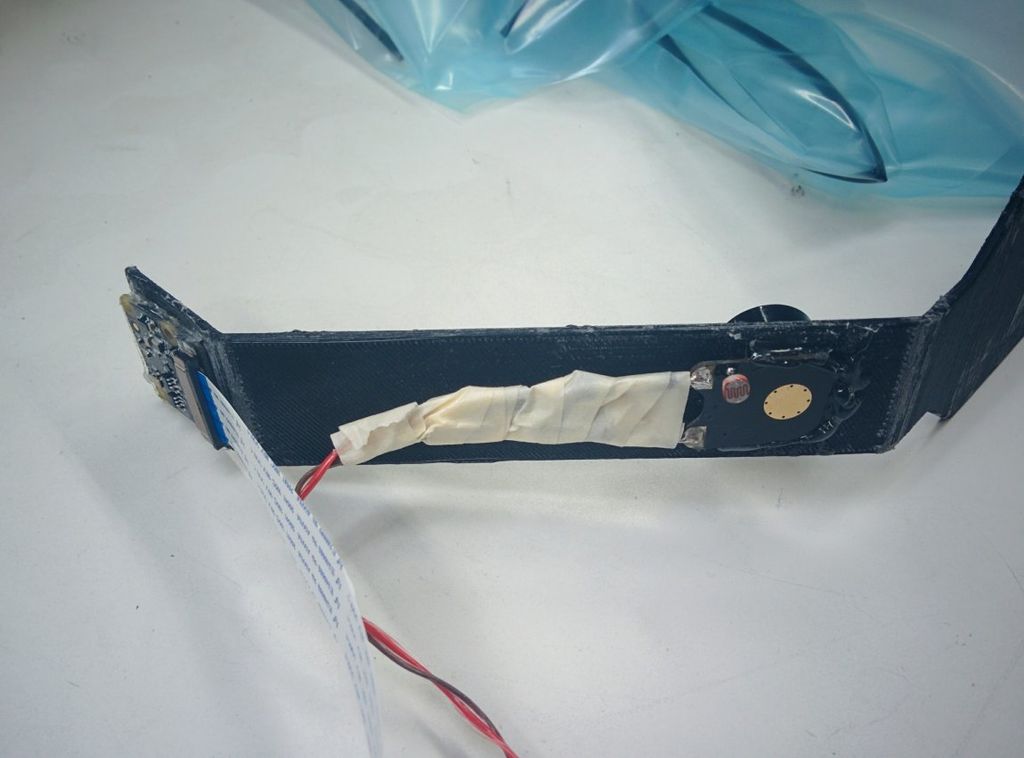
5、如图所示,将 IR LED 电线连接到树莓派。
6、小心处理内部的电线,将所有组件安装到位后,使用热熔胶密封到位。
校准部分
有关配置参数的详细信息,请参见 CribSense 存储库文档。
https://lukehsiao.github.io/CribSense/setup/config/
也可观看视频校准 CribSense。
这是配置文件的示例:
[io]                  ; I/O configuration
; input = path_to_file  ; Input file to use
input_fps = 15          ; fps of input (40 max, 15 recommended if using camera)
full_fps = 4.5          ; fps at which full frames can be processed
crop_fps = 15           ; fps at which cropped frames can be processed
camera = 0              ; Camera to use
width = 640             ; Width of the input video
height = 480            ; Height of the input video
time_to_alarm = 10      ; How many seconds to wait with no motion before alarm.

[cropping]            ; Adaptive Cropping Settings
crop = true                 ; Whether or not to crop
frames_to_settle = 10       ; # frames to wait after reset before processing
roi_update_interval = 800   ; # frames between recalculating ROI
roi_window = 50             ; # frames to monitor before selecting ROI


[motion]              ; Motion Detection Settings
erode_dim = 4           ; dimension of the erode kernel
dilate_dim = 60         ; dimension of the dilate kernel
diff_threshold = 8      ; abs difference needed before recognizing change
duration = 1            ; # frames to maintain motion before flagging true
pixel_threshold = 5     ; # pixels that must be different to flag as motion
show_diff = false       ; display the diff between 3 frames

[magnification]       ; Video Magnification Settings
amplify = 25                ; The % amplification desired
low-cutoff = 0.5            ; The low frequency of the bandpass.
high-cutoff = 1.0           ; The high frequency of the bandpass.
threshold = 50              ; The phase threshold as % of pi.
show_magnification = false  ; Show the output frames of each magnification

[debug]
print_times = false ; Print analysis times
算法的校准是一个反复的工作,没有确切的解决方案。你可以尝试各种值,并将它们与调试功能结合起来,以便找到最适合你的环境的参数组合。在开始校准之前,请确保将 show_diff 和 show_magnification 设置为 true。
原则上,增加放大率和 phase_threshold 值会增加应用于输入视频的放大倍数。你应该更改这些值,直到在视频帧中清楚地看到物体的运动为止。如果你看到伪影,在保持相同放大率的同时减小 phase_threshold 可能会有所帮助。
运动检测参数有助于补偿噪声。在检测运动区域时,使用 erode_dim 和 dilate_dim 来确定用于腐蚀和扩张运动的 OpenCV 内核的尺寸,以便首先消除噪声,然后将剩余的运动信号用于扩张以使运动区域明显。
https://docs.opencv.org/2.4/doc/tutorials/imgproc/erosion_dilatation/erosion_dilatation.html
如果你的婴儿床的对比度很高,则可能需要调整这些参数。在一般情况下,你需要设置更高的 erode_dim 高对比度,以及较低的 erode_dim 低对比度。
如果在 show_diff = true 的情况下运行 CribSense,会发现累加器输出的大部分为白色,或者视频的某些完全不相关的部分被检测为运动(例如,闪烁的灯),增加 erode_dim 直到视频的一部分仅对应婴儿的部分,大部分为白色。如图所示,侵蚀尺寸对于帧中的运动而言太小。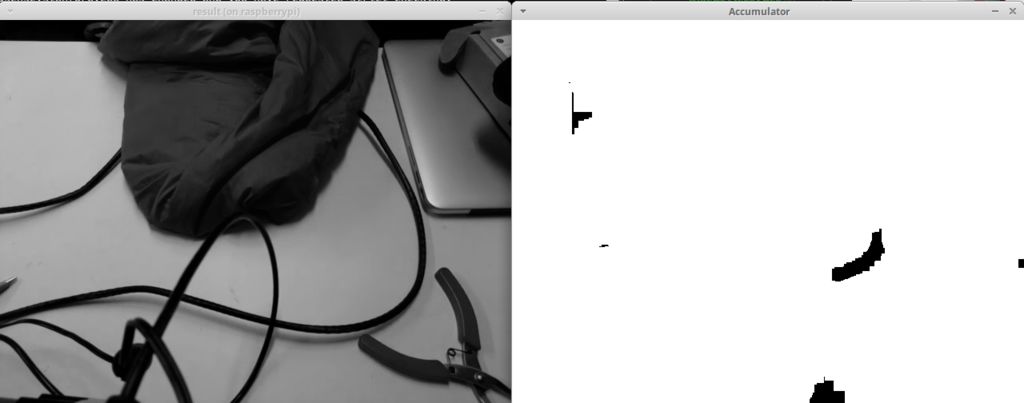
校准良好。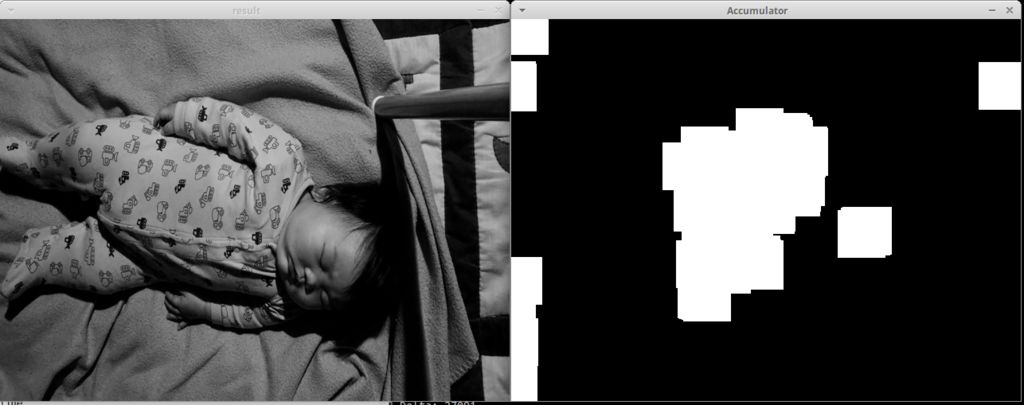
校准之后,请确保将 pixel_threshold 设置为一个值,以使“像素移动”仅报告像素移动的峰值,而不是所有峰值(你需要消除噪声)。理想情况下,你将在终端中看到类似这样的输出,存在一个与运动相对应的清晰的周期性模式:
[info] Pixel Movement: 0     [info] Motion Estimate: 1.219812 Hz
[info] Pixel Movement: 0     [info] Motion Estimate: 1.219812 Hz
[info] Pixel Movement: 0     [info] Motion Estimate: 1.219812 Hz
[info] Pixel Movement: 0     [info] Motion Estimate: 1.219812 Hz
[info] Pixel Movement: 44     [info] Motion Estimate: 1.219812 Hz
[info] Pixel Movement: 0     [info] Motion Estimate: 1.219812 Hz
[info] Pixel Movement: 161     [info] Motion Estimate: 1.219812 Hz
[info] Pixel Movement: 121     [info] Motion Estimate: 0.841416 Hz
[info] Pixel Movement: 0     [info] Motion Estimate: 0.841416 Hz
[info] Pixel Movement: 86     [info] Motion Estimate: 0.841416 Hz
[info] Pixel Movement: 0     [info] Motion Estimate: 0.841416 Hz
[info] Pixel Movement: 0     [info] Motion Estimate: 0.841416 Hz
[info] Pixel Movement: 0     [info] Motion Estimate: 0.841416 Hz
[info] Pixel Movement: 0     [info] Motion Estimate: 0.841416 Hz
[info] Pixel Movement: 0     [info] Motion Estimate: 0.841416 Hz
[info] Pixel Movement: 0     [info] Motion Estimate: 0.841416 Hz
[info] Pixel Movement: 0     [info] Motion Estimate: 0.841416 Hz
[info] Pixel Movement: 0     [info] Motion Estimate: 0.841416 Hz
[info] Pixel Movement: 0     [info] Motion Estimate: 0.841416 Hz
[info] Pixel Movement: 0     [info] Motion Estimate: 0.841416 Hz
[info] Pixel Movement: 0     [info] Motion Estimate: 0.841416 Hz
[info] Pixel Movement: 0     [info] Motion Estimate: 0.841416 Hz
[info] Pixel Movement: 0     [info] Motion Estimate: 0.841416 Hz
[info] Pixel Movement: 0     [info] Motion Estimate: 0.841416 Hz
[info] Pixel Movement: 0     [info] Motion Estimate: 0.841416 Hz
[info] Pixel Movement: 97     [info] Motion Estimate: 0.841416 Hz
[info] Pixel Movement: 74     [info] Motion Estimate: 0.839298 Hz
[info] Pixel Movement: 0     [info] Motion Estimate: 0.839298 Hz
[info] Pixel Movement: 60     [info] Motion Estimate: 0.839298 Hz
[info] Pixel Movement: 0     [info] Motion Estimate: 0.839298 Hz
[info] Pixel Movement: 0     [info] Motion Estimate: 0.839298 Hz
[info] Pixel Movement: 0     [info] Motion Estimate: 0.839298 Hz
[info] Pixel Movement: 0     [info] Motion Estimate: 0.839298 Hz
[info] Pixel Movement: 48     [info] Motion Estimate: 0.839298 Hz
[info] Pixel Movement: 38     [info] Motion Estimate: 0.839298 Hz
[info] Pixel Movement: 29     [info] Motion Estimate: 0.839298 Hz
[info] Pixel Movement: 28     [info] Motion Estimate: 0.839298 Hz
[info] Pixel Movement: 22     [info] Motion Estimate: 0.839298 Hz
[info] Pixel Movement: 0     [info] Motion Estimate: 0.839298 Hz
[info] Pixel Movement: 0     [info] Motion Estimate: 0.839298 Hz
[info] Pixel Movement: 0     [info] Motion Estimate: 0.839298 Hz
[info] Pixel Movement: 0     [info] Motion Estimate: 0.839298 Hz
你的输出想这样:
[info] Pixel Movement: 921     [info] Motion Estimate: 1.352046 Hz
[info] Pixel Movement: 736     [info] Motion Estimate: 1.352046 Hz
[info] Pixel Movement: 666     [info] Motion Estimate: 1.352046 Hz
[info] Pixel Movement: 663     [info] Motion Estimate: 1.352046 Hz
[info] Pixel Movement: 1196     [info] Motion Estimate: 1.352046 Hz
[info] Pixel Movement: 1235     [info] Motion Estimate: 1.352046 Hz
[info] Pixel Movement: 1187     [info] Motion Estimate: 1.456389 Hz
[info] Pixel Movement: 1115     [info] Motion Estimate: 1.456389 Hz
[info] Pixel Movement: 959     [info] Motion Estimate: 1.456389 Hz
[info] Pixel Movement: 744     [info] Motion Estimate: 1.456389 Hz
[info] Pixel Movement: 611     [info] Motion Estimate: 1.456389 Hz
[info] Pixel Movement: 468     [info] Motion Estimate: 1.456389 Hz
[info] Pixel Movement: 371     [info] Motion Estimate: 1.456389 Hz
[info] Pixel Movement: 307     [info] Motion Estimate: 1.456389 Hz
[info] Pixel Movement: 270     [info] Motion Estimate: 1.456389 Hz
[info] Pixel Movement: 234     [info] Motion Estimate: 1.456389 Hz
[info] Pixel Movement: 197     [info] Motion Estimate: 1.456389 Hz
[info] Pixel Movement: 179     [info] Motion Estimate: 1.456389 Hz
[info] Pixel Movement: 164     [info] Motion Estimate: 1.456389 Hz
[info] Pixel Movement: 239     [info] Motion Estimate: 1.456389 Hz
[info] Pixel Movement: 733     [info] Motion Estimate: 1.456389 Hz
[info] Pixel Movement: 686     [info] Motion Estimate: 1.229389 Hz
[info] Pixel Movement: 667     [info] Motion Estimate: 1.229389 Hz
[info] Pixel Movement: 607     [info] Motion Estimate: 1.229389 Hz
[info] Pixel Movement: 544     [info] Motion Estimate: 1.229389 Hz
[info] Pixel Movement: 499     [info] Motion Estimate: 1.229389 Hz
[info] Pixel Movement: 434     [info] Motion Estimate: 1.229389 Hz
[info] Pixel Movement: 396     [info] Motion Estimate: 1.229389 Hz
[info] Pixel Movement: 375     [info] Motion Estimate: 1.229389 Hz
[info] Pixel Movement: 389     [info] Motion Estimate: 1.229389 Hz
[info] Pixel Movement: 305     [info] Motion Estimate: 1.312346 Hz
[info] Pixel Movement: 269     [info] Motion Estimate: 1.312346 Hz
[info] Pixel Movement: 1382     [info] Motion Estimate: 1.312346 Hz
[info] Pixel Movement: 1086     [info] Motion Estimate: 1.312346 Hz
[info] Pixel Movement: 1049     [info] Motion Estimate: 1.312346 Hz
[info] Pixel Movement: 811     [info] Motion Estimate: 1.312346 Hz
[info] Pixel Movement: 601     [info] Motion Estimate: 1.312346 Hz
[info] Pixel Movement: 456     [info] Motion Estimate: 1.312346 Hz
调整 pixel_threshold 和 diff_threshold 直到只看到峰值,否则像素移动为 0。
安装示例
这是一段关于 CribSense 工作的演示。仪器安装在婴儿床的侧面。
将仪器安装到婴儿床时,需要优化婴儿和摄像头之间的距离。理想情况下,婴儿的胸部将不超过帧的 1/3。摄像头太远,得到的低分辨率的视频,画面放大后也没有内容。摄像头相机太近,容易造成婴儿跑出画面。如果婴儿“包裹”在毯子下,毯子和婴儿胸部之间接触有限,可能很难检测到运动。
你还需要考虑婴儿床周围的照明情况。如果你的婴儿床就在窗户旁边,当天气多云时或窗外物体移动时会形成的阴影或者需要改变光线值。照明环境始终如一效果最好。
在未来,软件会得到提升,从而使校准过程更加顺利。还可以添加其他功能,例如推送通知等。
故障排除
安装 CribSense 时,你可能会遇到一些常见问题。例如,在构建或运行程序时遇到问题,或听不到任何声音。你需要进行调整,当你进行改进时,请反应到我的 GitHub 库。
https://github.com/lukehsiao/CribSense
以下是我们收集的一些故障排除技巧。
1、没有闹钟响。
请检查的扬声器是否在工作。
你在 CribSense 闹钟之外是否播放了由树莓派发出的其他声音吗?
你的树莓派是否尝试通过 HDMI 而不是音频端口播放音频?检查“树莓派音频配置”页面,以确保你选择了正确的输出。
https://www.raspberrypi.org/documentation/configuration/audio-config.md
CribSense 软件是否检测到运动?如果 CribSense 在后台运行,请在终端中使用 journalctl -f 进行检查。
如果 CribSense 感应到很多运动,则可能需要校准 CribSense。
2、红外指示灯不工作。
当你查看红外线 LED 时,你能看到淡红色的环吗?LED 亮起时,应该可以看到。
检查连接的极性。如果 +5V 和 GND 接反,则将不起作用。
将 LED 连接到电压/电流限制为 5V/0.5A 的电源。通常,它在 5V 时应消耗 0.2A 的电流。如果不是,则你的 LED 可能故障。
3、即使没有婴儿,CribSense 仍在检测运动。
你是否正确校准 CribSense?
请记住,CribSense 只在寻找时像素值的变化。
画面内是否有阴影的移动?
是否有闪烁或灯光的变化?
CribSense 是否安装妥当(即如果有人经过它,它不会摇动)?
画面中是否还有其他运动源(镜面反射光等)?
4、即使有运动,CribSense也不会检测到运动。
你是否正确校准 CribSense?
摄像头上是否有其他东西?
是否从树莓派连接到摄像头?在终端中运行 raspistill -v 进行检查,打开树莓派上的摄像头几秒钟。
查看sudo systemctl status cribsense,可 CribSense 是否在运行?
查看婴儿是否在被“包裹”起来的毛毯下,导致无法检测到婴儿?如果毯子和婴儿之间存在较大的间隙,毯子可能挡住运动。
如果放大视频后,是否可以看到动画?
如果你调整低频和高频截止频率,是否能看到运动?
如果仅在弱光下发生这种情况,确定校准是否在弱光下工作吗?
5、CribSense无法建立。
你是否安装了所有依赖项软件?
6、不能运行 cribsense 的命令行。
在运行软件时 ./autogen.sh --prefix=/usr --sysconfdir=/etc --disable-debug 时是否存在偶然性输入错误?
cribsense 是否存在于 /usr/bin 中?
如果运行“which cribsense”,将提供什么路径?
